After months of animation, modelling, rigging, lighting, rendering and editing, Seriously? #3 is finally finished! It's a bit music video ee. I watched some Beyoncé and Madonna a long with some more recent offerings to get in the right groove.
Darling! You're finished?
This one introduces Divatron 9000 – a glamorous gold robot who promises to solve all of Stinky Von Tentacles' problems. As you might expect from the Seriously? universe... things don't exactly go to plan.
Accepting help from a mysterious robot diva comes with a few unexpected upgrades...
This may sting a little bit.
Set aboard a gleaming sci-fi laboratory filled with transforming machinery, malfunctioning chicken robots and more shiny metal than is probably safe, Seriously? #3 continues the story begun in the first two films with another dose of weird sci-fi comedy and slapstick chaos.
Like the previous films, everything was created by me, from the animation and character work to the environments, lighting and visual effects. It has been a huge project, but seeing these characters and this strange little universe continue to grow has made it worthwhile.
Shiny robot girlfriends are the best!
If you're new to the series, you can also catch up with the earlier films:
Seriously? – where poor Stinky first meets the hopelessly romantic Pootle McDerp.
Seriously? #2– where a hospital visit somehow turns into an even bigger disaster.
Thanks to everyone who has watched, commented, shared the trailers, or followed the project while it was in production. Every view genuinely helps independent animation reach a wider audience.
I'd love to know what you think.
And one question...
Which character deserves their own short next?
🤖 Divatron 9000 💚 Stinky Von Tentacles 🐔 Chicken Bot 🔴 Big Bong & Rinky Dink 👽 Pootle McDerp
This is another trailer for Seriously? #3, this time focusing on DivaTron doing what she does best — performing, posing, and possibly taking over.
There’s less story here and more attitude. It’s very much leaning into the music video side of things, which has been a lot of fun to play with while I’m finishing the film.
DivaTron is one of those characters that kind of designs herself as you go. Started as a simple idea, but the more I animated her the more she turned into this full-on diva presence — very controlled, very confident, and slightly… off.
“I’ll make it right for you.”
Still working through the final shots for Seriously? #3, but I’ve been cutting these trailers together alongside production. It’s been a good way to test different tones and see what stands out.
For anyone who saw the last trailer — this is a different angle on the same film. More performance, less setup.
If you missed the previous trailer, you can check it out here:
And if you’ve no idea what Seriously? is, you can watch the original short here:
Back on the giant alien spaceship, things have escalated.
What started as an awkward romantic misunderstanding has now become a full-blown security incident involving two robot guards, one dangerously persistent admirer, and an alien who really just wants to be left alone.
There is love in the air again…
…which is unfortunate, because there is also a lot of alien goo.
For this second short, I wanted to push things further. The first film was very simple and quick, but this time I introduced more characters, more moving parts, and a bit of full-on slapstick action.
The biggest addition was the two guards:
Big Bong – experienced, unflappable, not paid enough for this. Rinky Dink – not experienced, very flappable, definitely shouldn’t be holding a weapon.
They guard a very important door.
What’s behind the door?
Well… Stinky Von Tentacles, still recovering from the events of the first film and understandably not keen on any repeat performances.
Enter Pootle Mc Derp
Pootle returns, and he has learned absolutely nothing.
This time he arrives bearing gifts:
A large potted plant
An enormous heart-shaped box of chocolates
Which, in his mind, should smooth everything over.
It does not.
Building the action
Unlike the first short, this one needed proper choreography.
There’s a sequence where:
Pootle flips and bounces his way past the guards
Rinky Dink tries (and fails) to stop him
Big Bong attempts to maintain some level of professionalism
This was all animated very deliberately to feel fast, chaotic, and slightly out of control.
Rinky Dink in particular was a lot of fun to animate. He’s essentially a walking mistake.
The problem with adding more
More characters = more complexity.
Suddenly you’re dealing with:
Timing between multiple characters
Clear staging so the action reads
Making sure the joke actually lands
And most importantly:
Making sure the ending is worth it
The ending…
Without spoiling too much (although you probably know what’s coming if you’ve seen the first one),
Let’s just say:
Things escalate
Physics becomes a factor
And Stinky’s day gets significantly worse
Again.
Visual style
I kept the same sci-fi setting:
Large metallic environments
Big doors, heavy machinery
That slightly ominous “something’s not right” atmosphere
But contrasted it with very silly, exaggerated character animation.
That contrast is really what makes it work.
I also made a lot of trailers for this where I experimented with some different directions, my first real try at the youtube shorts format.
Final thoughts
Seriously? #2 is bigger, louder, and messier than the first.
It’s still short, still ridiculous, and still built around one very simple idea:
Some people just don’t take the hint.
Just when things couldn’t possibly get any worse…
They do.
Seriously? #3 is coming.
You haven't watched Seriously? #1 you can catch it here.
If you enjoy it, please share it around — it really helps.
Here is a time lapse of me drawing on my new tablet. I did it on the train. It's not very edited so there are some gaps. I'm not used to editing these weird tablet resolutions and all my kit is set up for standard TV and film resolution. Well it's 720 by 1200 so I would probably be fine if it was the other way round. I tried using the editor in youtube studio but it is pretty awful.
It's the first time for a long time I put some effort into 2d and recorded the results. I do occasionally work on paper with my daughter when she is drawing. I have never done a time lapse like this before I know a lot of drawing apps have it built in but it's my first time trying it. Interesting to see it. I usually work very roughly and I don't mid a sketchy rough finish. I think it gives more character plus overly finishing a drawing or painting kills the dynamism I've always thought. Digital art is different to traditional art as you can go in and edit as many times as you want where as with traditional paper and art materials there comes a point where you destroy the paper if you over work too much.
I usually use on old Wacom where I draw on the tablet and see what I'm doing on the screen. This is because when I shifted over to tablet the cost of a set up where you are drawing on a screen was extremely high. I was working in games at the time and even the concept artist who was doing nothing but drawing was working on a standard pen tablet. Grunt artists like me used to hand paint our textures, back then a Wacom was standard issue. There was always a bit of a faff with pens going missing.
I don't often get it out and my Wacom is very old and it broke! The pen kind of sprang apart and springs and pieces went everywhere. At first I couldn't put it back together and I started looking at alternatives and that's what led me to looking at a new tablet. I have since fixed my Wacom pen it seems a little unhappy and does not fully fit back together as it used to but still works.
I still splashed out on a new tablet which is very portable and like a doodle pad. I used to draw all the time as a kid when I was bored. In the back of lessons on the cover of my exercise books or in the back pages. I've worked with other animators who have apple tablets that they doodle on. I hate apple so I got an Android one. It feels odd to have a pen back in the way of what I'm drawing I'm so used to the line magically appearing while I scratch away on my Wacom.
Working on Goosebumps Horrorland was a wild ride, full of challenges, lessons, and memories I still think about today. It was also the project where I did the most cutscene work in my games career. Initially, I was hired as a model maker and environment artist, a shift from my previous roles, where I was typically brought on as an animator. For context, I was a generalist in earlier jobs and had experience across all areas of game art—animation, modeling, texturing, and more. However, animation was always my main ticket in.
At the time, I had decided to pivot from animation to focus on environments, props, and texturing. I wanted to explore other facets of game development, especially as motion capture seemed to be taking over much of animation. That said, the opportunity to dive back into narrative animation through the cutscenes for Horrorland was too good to pass up, even if it came with plenty of hurdles.
Above is the first cut scene I did on the project. I got the most notes on this one and I was very worried as I really struggled to get up to 8 seconds a day which was my initial goal, but I knew I needed to increase it to deliver on time. It took ages to approve and I think I was still doing notes on this up till the end. The publishers used to give a lot of notes when we had close ups on the characters faces. We didn't have many controls to work with and it was difficult to make them stay appealing and expressive.
The Cutscenes That Keep Getting Views
The cutscenes I worked on for Goosebumps Horrorland have become the most-viewed content on my YouTube channel. Many of these videos have over 100,000 views, and they’ve been the source of fan mail. While it’s gratifying to know people enjoy them, it’s a little surreal. These cutscenes were created under immense pressure, with tight deadlines and resource constraints. As much as I wish they showcased my best work, they represent a time when I had to balance speed with quality—a constant tug-of-war.
I often get questions like:
"Why is the render so low quality?"
"Why does the sound seem unfinished?"
The answer lies in the tools and processes of the time. These videos are playblasts—viewport renders from 3D Studio Max. They capture what I saw while animating: low graphical settings, no lighting, no textures, and no anti-aliasing. The low settings were essential for smooth playback in the software. These playblasts were quick and functional, designed to get publisher approval before integrating the animation into the game engine.
The sound is unfinished the final version in the game was likely tweaked at a later date so if there is music it may not be final.
From Props to Cutscenes
Initially, I worked on environments and props for the game. There was another animator handling the cutscenes, but the tight schedule made it clear he needed help. After some back-and-forth, I was brought on to assist. Before long, I found myself taking the lead when the original cutscene animator left the project.
The work was daunting, especially given the process: storyboards, animatics, animation, and multiple approval stages. Each cutscene had about a week’s turnaround, with some days lost waiting for feedback. Despite the challenges, I enjoyed the chance to focus on hand-keyed animation for narrative scenes, even if it came at the cost of long hours and stress.
The Freelancer Fiasco
One particularly frustrating chapter of the project was the freelancer we hired to help. He chose to work on the final cutscene—the most important and action-heavy sequence of the game. Unfortunately, his skills didn’t match the task. His work was so poor that I had to redo about 70% of it. By that point, I was running on fumes, but I managed to salvage what I could.
This final cutscene is a sticking point for me. I often get comments on YouTube asking why I haven’t posted it. The truth is, it’s a strange mix of my fixes and his original work, and I’m not comfortable showcasing it. It’s frustrating because I know how much better it could have been if I’d had the chance to start fresh.
The GG transformation was something that got done at the 11 hour. The initial plan was to show GG's shadow changing in to her monster form but there was some technical problems. I wanted to get the cut scene done and approved and so pushed for this texture swap with the wings appearing. I think the other model is actually behind GG and either has transparent textures or is scaled, can't remember how I did it in the end but this is the vid I showed to the team to get approval for the idea.
This is from the final cut scene I think I did this bit from scratch as our freelancer didn't manage to finish before it got passed to me. These 3 vids show the way I used to work from a very rough stage below.
The below clip shows the animation about half way through
The last clip shows animation as it was used in the cut scene (I think unless I got asked to alter it). All of this work is long before I started working in TV and is from 2008. I get a lot of comments on the half way done animation and the first rough animation telling me they suck. Well it all sucks but thankfully I can animate better now! Although most TV jobs also have a lower seconds per day out put then this did and with doing the sound editing storyboards and camera direction it was pretty crazy. Also the last time I worked in the main stream games industry.
A Baptism of Fire
Looking back, Goosebumps Horrorland was a trial by fire. The tight deadlines pushed me to animate up to 20 seconds a day while juggling sound editing, storyboarding, and camera direction. It was exhausting, but it taught me resilience and how to prioritize under pressure.
A strong memory on this project was that the games testing was done in studio behind me. So all day everyday I used to hear "Yo Yo Yo it's bumper carnage" along with all the lines from the cut scenes like "Double Wow!"
While the cutscenes may not be my proudest technical work, they hold a unique place in my career. They’re the only project that’s brought me fan mail and consistent YouTube views—even after all these years. For a game released in 2008, that’s something.
If anything, this project reminds me how far I’ve come as an artist and animator. It may not have been perfect, but it was a stepping stone that helped shape my journey.
Welcome to this tutorial on creating a female walk cycle in Maya! In this post, I’ll walk you through the process of building a smooth, natural-looking walk cycle, starting from scratch. Whether you’re a beginner or just brushing up on animation principles, this guide will cover the essentials of hand-keyed animation—the same techniques used in games, TV, and film.
If you prefer to see the process in action, check out my video tutorial [embedded above].
Step 1: Start with the Key Poses
The foundation of any walk cycle lies in the key poses. For a standard cycle, we focus on four main poses:
Passing Pose: One leg passes the other while the weight shifts.
Stride (or Contact) Pose: The legs are at their furthest apart, marking the extremes of the stride.
These poses are then mirrored for the opposite side, creating a symmetrical cycle. In the video, I show how to use the passing pose as the loop frame. This ensures your animation can repeat seamlessly.
Step 2: Blocking the Animation
At this stage, I work in stepped mode—a setting that eliminates interpolation between poses. This approach keeps the animation "snappy" and focused, allowing me to adjust the main poses without distraction from computer-generated in-betweens.
Once the key poses are in place, I mirror them manually. Some rigs have a "mirror pose" feature, but for this project, I handled it by hand. It’s worth noting that many free rigs available online include mirroring tools to save time.
Step 3: Refining the Motion
With the main poses set, it’s time to add tween frames, which double the number of key poses and smooth out the motion. This involves:
Using the graph editor to tweak translation and rotation curves.
Ensuring legs and feet land correctly, with natural arcs as they lift and plant.
Adjusting the hips for a fluid, balanced sway that complements a female walk.
For characters with exaggerated features (like larger hips), you can accentuate the sway for added personality.
Step 4: Adding Details
Once the foundation is strong, I layer in the smaller, more dynamic elements:
Arms and Hands: I used IK (inverse kinematics) for this rig, but FK (forward kinematics) is often simpler for walk cycles.
Hair and Accessories: Elements like hair bounce or accessories add realism and flair. For this walk, I manually animated these details for full control.
Character-Specific Motion: For instance, this character has secondary motion in the chest area, which I animated by hand instead of using physics simulations.
Step 5: The Final Polish
The last stage involves fine-tuning and ensuring the animation loops perfectly. For this, I used a translating floor plane to double-check foot placement and reduce any "sliding" issues. Small tweaks in the graph editor ensure that the movement feels fluid and polished.
Tips and Tricks for Animating Walk Cycles
Keep It Simple at First: Focus on the main poses and smooth motion before diving into secondary details.
Use References: Study real-life footage or reference videos to capture realistic motion.
Experiment with Tools: While Maya is my tool of choice, the principles apply across software like Blender, Max, or even traditional 2D animation.
Watch the Tutorial
Ready to see the entire process? Watch the embedded video below to follow along in real-time. This animation took several hours to complete, but in the video, I’ve condensed the steps into a 15-minute walkthrough.
Conclusion
Creating a walk cycle is one of the most fundamental skills for animators, and mastering it can open doors to all kinds of projects. I hope this guide (and the accompanying video) gives you the confidence to create your own. If you have any questions or want to share your work, drop a comment below—I’d love to see what you come up with!
After working on a children’s TV show in Ireland, I felt the itch to create something completely for myself. I wanted a project that wasn’t bound by deadlines, client feedback, or the need to be practical—just something where I could dive into my imagination and make something fun, nostalgic, and a little out there.
And that’s how this UFO animation came to be.
A Love Letter to 50s Sci-Fi and a Little Cartoon Absurdity
For some reason, I always find myself drawn back to the charm of 1950s sci-fi. There’s something about the bright colors, campy plots, and those flying saucers that’s both retro and timeless. Maybe it’s the idea that anything—anything—is possible out there in space. And when I had an Alien model sitting in Blender, rigged up but unused, I knew it was time to give this little guy a life of his own.
Originally, I built this alien model for a different project in Blender. This children’s show marked my first time diving into Blender, and I went a little ambitious on character creation. I learned pretty quickly that a simpler robot design would work best for learning the ropes. So, this little green fellow was left in my files, fully modeled but without a purpose. Until now.
The Result? An Absurd Animation Just for the Fun of It
So I decided to turn this model into a quirky short animation sequence. Think of it as a mini homage to Marvin the Martian and all those flying saucers that had us glued to the screen as kids. It’s ridiculous, nostalgic, and completely handcrafted—polygons and all—over a lot of late nights and probably more coffee than was advisable.
This clip is 100% my own creation, and there’s no other agenda here than to share a laugh (or maybe a groan) over a hovering UFO that’s suspiciously cartoonish. If you’re into quirky animation, sci-fi throwbacks, or just need a quick escape from the daily grind, I think you’ll get a kick out of this one.
This is just the start of what I hope will be a collection of personal animation projects, each with its own dash of weirdness. If people seem to enjoy it, who knows? I might expand this into more stories, or bring in new characters from this universe I’m dreaming up.
So take a look, share a laugh, and let me know if this clip made you feel a bit like a kid again—or at least had you questioning if maybe, just maybe, the UFOs we saw on Saturday morning cartoons could be real.
Watch the video below, and let’s chat in the comments. Are you more of a UFO believer or a skeptic?
🚀👾 P.S. Don’t forget to hit “like” and subscribe on YouTube if you enjoyed it—it really helps indie animators like me keep these projects going!
Seriously? is my new short animation. Working in my favorite theme sci-fi it's set on a giant alien spaceship and shows the interaction of two of the inhabitants. There is love in the air....and on the floor and in your face. I asked my daughter for an idea for a short, she gave me nothing for hours saying she was thinking and then came up with a two sentence idea and Seriously? was the result.
My first job was to build a new character, My little green man #1. I wanted to do something cartoony and cute with appeal and simplicity. It took me a couple of tries as my first version was ugly, I like to sculpt my characters with lots of detail but it turned out that less was more. Simple rounded shapes made the character look cuter.
Surface of the model laid out for painting
Maya base model to Zbrush to texture test
Serious pose done in Maya rendered with 3Delight
My next job was to create an animatic. An animatic is a very rough version of the film where you can see the intended actions and camera shots but animation is very basic, just enough to show what happens.
So once you have your animatic it's basically a case of refining until you have your final animation version. You can see that while I was animating I had a placeholder background. I put the final version of the background in after the animation was done. Next I will show you an early version of the animation.
In that version you can see the animation is quite rough, some of the last shots look very different in the final version. There is no sound, the sound was worked on by my good friend Rafa Tomás Velázquez who was my house mate in Dublin. He is a talented guy and you can see more of his work over at Farmode .
Once I had finished the animation the last step was rendering I used 3Delight for the final render but I also tried Mental Ray and Renderman.
Renderman as used by Pixar........not really working for me :(
Mental Ray looked very nice but .....wasn't free :(
3Delight saves the day
Rendering was a headache, I set up all my lights with and did all my tests with 3Delight, it kept crashing on me but I thought it should be all right when I rendered a full sequence a batch render........it wasn't. This lead me to try the other two, Mental Ray is what I have most experience with but at first it wasn't running. After poking around on the internet I found a solution and got it working and it looked great...........but I didn't realize you had to pay if you want it to batch render. You can render stills but to render a sequence you have to buy it.
Renderman to the rescue! Pixar use it it must be amazing!...........WADDAYA MEAN IT TAKES 10 MINUTES TO RENDER A FRAME!!! Erm....yeah so seems my laptop is not Pixar ready, I could only get very ugly results with my background in Renderman. Back to the drawing board. Luckily in picking through my scene so many times to set it up for the different rendering programs I discovered my camera was corrupt. This was what was causing 3Delight to crash and after that everything went smoothly.
It would be great if people could share this post and the film, I would love Seriously? to get a big audience.
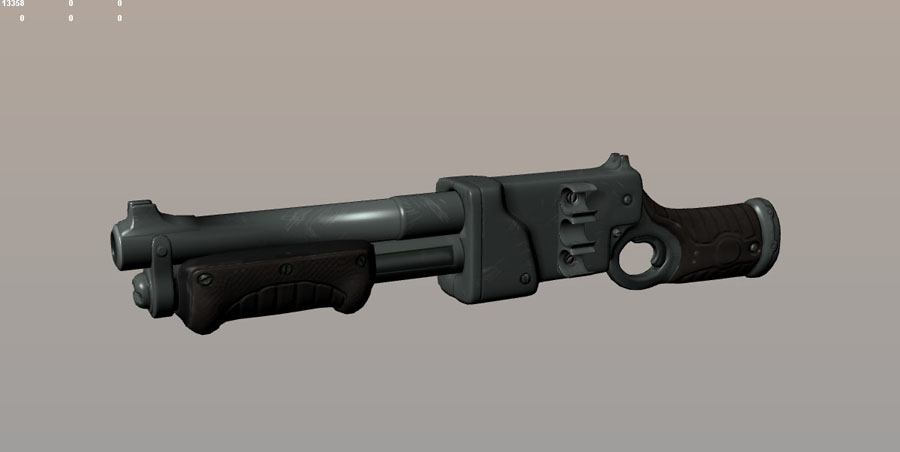
Here is my new Pump Action Shotgun model available from Turbosquid now. You can get it for Maya, Max, in fbx, or obj format. It's a polygonal model coming in at faces 7519 verts 7485 for the shotgun with three cartridge models included. If you go over to turbosquid you can see a little animation of the shotgun pump action firing and ejecting shells.
I'm going to talk here a little about how I built the model and converting it from Maya to Max.
Maya Low poly shotgun
I started out with a low poly base mesh which I built in Maya I then UV mapped the low poly model. I decided to have a look around to see if I could find a better UV mapping solution for this model. I normally make organic models and have been using Zbrushes UV master but it's no good for mechanical stuff like the shotgun. I ended up using Roadkill, it's a good program for low polygon. I also tried Maya's unfold but found it to be so loaded with bugs that it was unworkable.
Shotgun in Roadkill for UV mapping
Once this was done I exported the model as an obj and brought it into Zbrush for detailing. I separated the model into a number of subtools so that I could get a higher level of detail into the model.
Base model in Zbrush
Below are my high poly Zbrush sculpts with a shiny material on them so they look pretty. I found it quite hard to sculpt a mechanical object like this, but the idea was to push myself specifically into a hard surface object and I learnt a lot from it.
The next step for me was to get normal maps from the high poly sculpt onto a lower poly version of the shotgun. For this step I used xNormal which I have been using for a while and for me it seems the most reliable tool for this. As I had a number of subtools and because some areas of the shotgun overlap I used my subtools to normal map the shotgun in sections that fit into one texture page when assembled (if you look at the Roadkill screen shot you can see my texture page). Overlapping objects in normal mapping will cause errors if not dealt with separately.
This is where things went wrong..................
I had some ugly texture stretching going on which you can see above. The strange saw tooth effect showing on the piece above is pixelation on a normal map. What I did to fix this was re-map the shotgun at a higher poly division and also I altered my UV islands. I also rebuilt the barrel and used edge creasing in Zbrush to keep my edges sharp. The rifle butt needed re sculpting as I didn't have enough geometry in my low poly to make my original version work. All useful things to learn, edge creasing in Zbrush is an easy way to keep your crisp edges. For mechanical objects it's better to be generous with your low poly when it comes to curved areas like the rifle barrel. I discovered that Roadkill does not cope with higher poly models and ended up mapping the shotgun in sections, it wasn't too bad, I used the subtool division from Zbrush.
Next step texturng. Above is an early base colour version. You can see the barrel has changed from the Zbrush version. Below is the altered mapping from the higher poly division shotgun.
One more thing I wanted to share, as it drove me up the wall. This is the first model that I have converted to Max. It's pretty simple for a model like this which is just geometry with some separate parts. I exported the model as an obj. I learnt that to keep my pivot points accurate I needed to export all elements from the origin. I learnt how to rebuild my materials in Max, all pretty straight forward........until normal map seams!
The horror!
I'mgoing to run through what happened and how I solved it starting with setting up the normal map slot in the material. The first step is to go to the maps section of the material. Set the bump map amount to 100, default is 30. Next click the map button marked none, select "Normal Bump" from the Material/Map Browser. Now select the normal texture node.
Select the Normal slot marked none and pick bitmap from the Material/Map Browser. Lastly and here is the fix. Once you have navigated to your normal map texture file go to the gamma option, select override and set it to 1 as shown in the image below. The problem is due to Max's default gamma option being set to 2 which gives you your seams.
I had to do lots of googeling to get to the bottom of that one, so I hope this will help others with there normal map woes. Typical Max that the default value doesn't work.
Fixed!
I could also tell you a thing or three about shotgun calibre, imperial to metric but I think it might be too exciting for you (sarcasm).