Showing posts with label animation. Show all posts

Wednesday, 8 July 2026

Seriously? #3 – The Robot Diva Has Arrived!


After months of animation, modelling, rigging, lighting, rendering and editing, Seriously? #3 is finally finished! It's a bit music video ee. I watched some BeyoncΓ© and Madonna a long with some more recent offerings to get in the right groove.

Darling! You're finished?

This one introduces Divatron 9000 – a glamorous gold robot who promises to solve all of Stinky Von Tentacles' problems. As you might expect from the Seriously? universe... things don't exactly go to plan.
 Accepting help from a mysterious robot diva comes with a few unexpected upgrades...

This may sting a little bit.

Set aboard a gleaming sci-fi laboratory filled with transforming machinery, malfunctioning chicken robots and more shiny metal than is probably safe, Seriously? #3 continues the story begun in the first two films with another dose of weird sci-fi comedy and slapstick chaos.


Like the previous films, everything was created by me, from the animation and character work to the environments, lighting and visual effects. It has been a huge project, but seeing these characters and this strange little universe continue to grow has made it worthwhile.

Shiny robot girlfriends are the best!

If you're new to the series, you can also catch up with the earlier films:

  • Seriously? – where poor Stinky first meets the hopelessly romantic Pootle McDerp.
  • Seriously? #2 – where a hospital visit somehow turns into an even bigger disaster.

Thanks to everyone who has watched, commented, shared the trailers, or followed the project while it was in production. Every view genuinely helps independent animation reach a wider audience.

I'd love to know what you think.


And one question...

Which character deserves their own short next?

πŸ€– Divatron 9000
πŸ’š Stinky Von Tentacles
πŸ” Chicken Bot
πŸ”΄ Big Bong & Rinky Dink
πŸ‘½ Pootle McDerp

Monday, 13 April 2026

Seriously? #3 – Is Your System Sliding? (Trailer 2)


So… things are getting a bit stranger.

This is another trailer for Seriously? #3, this time focusing on DivaTron doing what she does best — performing, posing, and possibly taking over.

There’s less story here and more attitude. It’s very much leaning into the music video side of things, which has been a lot of fun to play with while I’m finishing the film.


DivaTron is one of those characters that kind of designs herself as you go. Started as a simple idea, but the more I animated her the more she turned into this full-on diva presence — very controlled, very confident, and slightly… off.

“I’ll make it right for you.”

Still working through the final shots for Seriously? #3, but I’ve been cutting these trailers together alongside production. It’s been a good way to test different tones and see what stands out.

For anyone who saw the last trailer — this is a different angle on the same film. More performance, less setup.


If you missed the previous trailer, you can check it out here:


And if you’ve no idea what Seriously? is, you can watch the original short here:

πŸ‘‰ Seriously? #1


More soon.

Be seeing you. Seriously.


Wednesday, 1 January 2025

The Bumpy Ride of Goosebumps Horrorland: Behind the Cutscenes


Working on Goosebumps Horrorland was a wild ride, full of challenges, lessons, and memories I still think about today. It was also the project where I did the most cutscene work in my games career. Initially, I was hired as a model maker and environment artist, a shift from my previous roles, where I was typically brought on as an animator. For context, I was a generalist in earlier jobs and had experience across all areas of game art—animation, modeling, texturing, and more. However, animation was always my main ticket in.

At the time, I had decided to pivot from animation to focus on environments, props, and texturing. I wanted to explore other facets of game development, especially as motion capture seemed to be taking over much of animation. That said, the opportunity to dive back into narrative animation through the cutscenes for Horrorland was too good to pass up, even if it came with plenty of hurdles.


Above is the first cut scene I did on the project. I got the most notes on this one and I was very worried as I really struggled to get up to 8 seconds a day which was my initial goal, but I knew I needed to increase it to deliver on time. It took ages to approve and I think I was still doing notes on this up till the end. The publishers used to give a lot of notes when we had close ups on the characters faces. We didn't have many controls to work with and it was difficult to make them stay appealing and expressive.

The Cutscenes That Keep Getting Views

The cutscenes I worked on for Goosebumps Horrorland have become the most-viewed content on my YouTube channel. Many of these videos have over 100,000 views, and they’ve been the source of fan mail. While it’s gratifying to know people enjoy them, it’s a little surreal. These cutscenes were created under immense pressure, with tight deadlines and resource constraints. As much as I wish they showcased my best work, they represent a time when I had to balance speed with quality—a constant tug-of-war.

I often get questions like:

  • "Why is the render so low quality?"
  • "Why does the sound seem unfinished?"

The answer lies in the tools and processes of the time. These videos are playblasts—viewport renders from 3D Studio Max. They capture what I saw while animating: low graphical settings, no lighting, no textures, and no anti-aliasing. The low settings were essential for smooth playback in the software. These playblasts were quick and functional, designed to get publisher approval before integrating the animation into the game engine.

The sound is unfinished the final version in the game was likely tweaked at a later date so if there is music it may not be final.


From Props to Cutscenes

Initially, I worked on environments and props for the game. There was another animator handling the cutscenes, but the tight schedule made it clear he needed help. After some back-and-forth, I was brought on to assist. Before long, I found myself taking the lead when the original cutscene animator left the project.

The work was daunting, especially given the process: storyboards, animatics, animation, and multiple approval stages. Each cutscene had about a week’s turnaround, with some days lost waiting for feedback. Despite the challenges, I enjoyed the chance to focus on hand-keyed animation for narrative scenes, even if it came at the cost of long hours and stress.


The Freelancer Fiasco

One particularly frustrating chapter of the project was the freelancer we hired to help. He chose to work on the final cutscene—the most important and action-heavy sequence of the game. Unfortunately, his skills didn’t match the task. His work was so poor that I had to redo about 70% of it. By that point, I was running on fumes, but I managed to salvage what I could.

This final cutscene is a sticking point for me. I often get comments on YouTube asking why I haven’t posted it. The truth is, it’s a strange mix of my fixes and his original work, and I’m not comfortable showcasing it. It’s frustrating because I know how much better it could have been if I’d had the chance to start fresh.


The GG transformation was something that got done at the 11 hour. The initial plan was to show GG's shadow changing in to her monster form but there was some technical problems. I wanted to get the cut scene done and approved and so pushed for this texture swap with the wings appearing. I think the other model is actually behind GG and either has transparent textures or is scaled, can't remember how I did it in the end but this is the vid I showed to the team to get approval for the idea.


This is from the final cut scene I think I did this bit from scratch as our freelancer didn't manage to finish before it got passed to me. These 3 vids show the way I used to work from a very rough stage below.


The below clip shows the animation about half way through


The last clip shows animation as it was used in the cut scene (I think unless I got asked to alter it). All of this work is long before I started working in TV and is from 2008. I get a lot of comments on the half way done animation and the first rough animation telling me they suck. Well it all sucks but thankfully I can animate better now! Although most TV jobs also have a lower seconds per day out put then this did and with doing the sound editing storyboards and camera direction it was pretty crazy. Also the last time I worked in the main stream games industry.


A Baptism of Fire

Looking back, Goosebumps Horrorland was a trial by fire. The tight deadlines pushed me to animate up to 20 seconds a day while juggling sound editing, storyboarding, and camera direction. It was exhausting, but it taught me resilience and how to prioritize under pressure.

A strong memory on this project was that the games testing was done in studio behind me. So all day everyday I used to hear "Yo Yo Yo it's bumper carnage" along with all the lines from the cut scenes like "Double Wow!"

While the cutscenes may not be my proudest technical work, they hold a unique place in my career. They’re the only project that’s brought me fan mail and consistent YouTube views—even after all these years. For a game released in 2008, that’s something.

If anything, this project reminds me how far I’ve come as an artist and animator. It may not have been perfect, but it was a stepping stone that helped shape my journey.

Thursday, 31 October 2024

How a UFO Animation Took Flight… Out of Pure Creative Chaos


After working on a children’s TV show in Ireland, I felt the itch to create something completely for myself. I wanted a project that wasn’t bound by deadlines, client feedback, or the need to be practical—just something where I could dive into my imagination and make something fun, nostalgic, and a little out there.

And that’s how this UFO animation came to be.


A Love Letter to 50s Sci-Fi and a Little Cartoon Absurdity

For some reason, I always find myself drawn back to the charm of 1950s sci-fi. There’s something about the bright colors, campy plots, and those flying saucers that’s both retro and timeless. Maybe it’s the idea that anything—anything—is possible out there in space. And when I had an Alien model sitting in Blender, rigged up but unused, I knew it was time to give this little guy a life of his own.

Originally, I built this alien model for a different project in Blender. This children’s show marked my first time diving into Blender, and I went a little ambitious on character creation. I learned pretty quickly that a simpler robot design would work best for learning the ropes. So, this little green fellow was left in my files, fully modeled but without a purpose. Until now.


The Result? An Absurd Animation Just for the Fun of It

So I decided to turn this model into a quirky short animation sequence. Think of it as a mini homage to Marvin the Martian and all those flying saucers that had us glued to the screen as kids. It’s ridiculous, nostalgic, and completely handcrafted—polygons and all—over a lot of late nights and probably more coffee than was advisable.

This clip is 100% my own creation, and there’s no other agenda here than to share a laugh (or maybe a groan) over a hovering UFO that’s suspiciously cartoonish. If you’re into quirky animation, sci-fi throwbacks, or just need a quick escape from the daily grind, I think you’ll get a kick out of this one.

[Click here to watch it on YouTube!] πŸ›Έ πŸ‘½


Why I Made This—and Why I Hope You’ll Watch


This is just the start of what I hope will be a collection of personal animation projects, each with its own dash of weirdness. If people seem to enjoy it, who knows? I might expand this into more stories, or bring in new characters from this universe I’m dreaming up.

So take a look, share a laugh, and let me know if this clip made you feel a bit like a kid again—or at least had you questioning if maybe, just maybe, the UFOs we saw on Saturday morning cartoons could be real.

Watch the video below, and let’s chat in the comments. Are you more of a UFO believer or a skeptic?

πŸš€πŸ‘Ύ P.S. Don’t forget to hit “like” and subscribe on YouTube if you enjoyed it—it really helps indie animators like me keep these projects going!


Tuesday, 11 July 2017

Seriously?


Seriously? is my new short animation. Working in my favorite theme sci-fi it's set on a giant alien spaceship and shows the interaction of two of the inhabitants. There is love in the air....and on the floor and in your face. I asked my daughter for an idea for a short, she gave me nothing for hours saying she was thinking and then came up with a two sentence idea and Seriously? was the result.

Why so serious? ......BECAUSE!


My first job was to build a new character, My little green man #1. I wanted to do something cartoony and cute with appeal and simplicity. It took me a couple of tries as my first version was ugly, I like to sculpt my characters with lots of detail but it turned out that less was more. Simple rounded shapes made the character look cuter.
That's what I call UV mapping SERIOUSLY!
Surface of the model laid out for painting
Maya base mesh to Zbrush sculpt to render
Maya base model to Zbrush to texture test


That's a serious pose there....
Serious pose done in Maya rendered with 3Delight

My next job was to create an animatic. An animatic is a very rough version of the film where you can see the intended actions and camera shots but animation is very basic, just enough to show what happens.


So once you have your animatic it's basically a case of refining until you have your final animation version. You can see that while I was animating I had a placeholder background. I put the final version of the background in after the animation was done. Next I will show you an early version of the animation.


In that version you can see the animation is quite rough, some of the last shots look very different in the final version. There is no sound, the sound was worked on by my good friend Rafa TomΓ‘s VelΓ‘zquez who was my house mate in Dublin. He is a talented guy and you can see more of his work over at Farmode .

Once I had finished the animation the last step was rendering I used 3Delight for the final render but I also tried Mental Ray and Renderman.


Seriously rendered with Renderman
Renderman as used by Pixar........not really working for me :(

Seriously rendered with mental Ray
Mental Ray looked very nice but .....wasn't free :(

Seriously Title
3Delight saves the day 


Rendering was a headache, I set up all my lights with and did all my tests with 3Delight, it kept crashing on me but I thought it should be all right when I rendered a full sequence a batch render........it wasn't. This lead me to try the other two, Mental Ray is what I have most experience with but at first it wasn't running. After poking around on the internet I found a solution and got it working and it looked great...........but I didn't realize you had to pay if you want it to batch render. You can render stills but to render a sequence you have to buy it. 

Renderman to the rescue! Pixar use it it must be amazing!...........WADDAYA MEAN IT TAKES 10 MINUTES TO RENDER A FRAME!!! Erm....yeah so seems my laptop is not Pixar ready, I could only get very ugly results with my background in Renderman. Back to the drawing board. Luckily in picking through my scene so many times to set it up for the different rendering programs I discovered my camera was corrupt. This was what was causing 3Delight to crash and after that everything went smoothly.

It would be great if people could share this post and the film, I would love Seriously? to get a big audience.

Be seeing you! Seriously!
Be seeing you!

Friday, 23 May 2014

Animated audition a short slap stick test

Here is an audition I did for a job at the start of the year. The mail came out of the blue on the 3rd of January "We would like you to complete the audition ASAP".  I was given a version of the model to work on by the company but the rigg didn't work and the mesh had errors and too much subdivision to skin easily so I had to rebuild and re-rigged it. It was a bit of a mad rush to get it done in time but good practice. I always liked cartoons like Road Runner and the Pink Panther so it was fun to do something slap stick. One of the best things about it was I showed it to my kids and they loved it. I  really enjoyed doing the animation and hope you enjoy watching it , I haven't done something like this for a while so it made a nice change.


It's a little bit like the style I used to work in when I worked for Kuju on the Eye Toy games, I have an urge to try doing some more work like this as it came very easy to me. The swords and sorcery stuff I'm working on at the moment is a bit of a battle at times. The funny green thing I animated for the audition was much easier to set up and build than the characters I've been making recently. With a bit of Z-brush fiddling it could look really cool I think.


The clip above was a style test I did for Kuju.

Wednesday, 22 May 2013

Space Trooper poly character model

SpaceTrooper walking with rifle
 Here is a character model I've been working on in the background for some time. You may remember previously in Deranged Scratchings I put forward the character design for a Space Trooper but readers wanted me to build an alien with his brain in a jar and his eye on a stalk. I of course sympathized with this point of view and was happy to build said alien. I did however harbor a sneaking suspicion that there might be more of a demand for space soldiers than cooky looking aliens (I know heart breaking right?) and have been spending some time getting my camouflage and blast resistant kit into polygonal shape.
SpaceTrooper Sketch RedSpaceTrooper digital sketch
Above you can see the original design something between Street Fighters Bison and a padded UN soldier but in red instead of blue. Not my best character design I admit so I had another go. I did a bit of research this time and looked at what the latest fashions are in military apparel, added a sprinkling of sci-fi pixy dust  and came up with the second version which I was much happier with. I then want on to make the character in Z-Brush which......doesn't look anything like my concept sketch at all. This is not in any way to do with me getting distracted from my original concept, I have an iron will and would never start thinking that this character would look cool with giant spider, bionic spider legs with skulls on, with ethereal spirit aliens from dimension x riding a plinth of bones on his back....soooo anyway, below you can see the character running in Maya which is where I do all the skin weighting and rigging.

Space Trooper rigged in Maya

 Actually I'm getting ahead of myself I did a rough version that I had to throw away, there was a problem with the base mesh which meant I had to go back and start from scratch. I didn't get that far into the sculpting but it was still a pain at the time. I approached this model in a slightly different way to how I usually do my character models. Basically my normal method is to get a model that works properly in Maya and then take it into Z-Brush to add details. This model was created much more in Z-Brush, the idea was to take a much more loose organic approach to the modelling more like sketching in clay and then working over that to get the finished model. It did work but there was more than the usual amount of trial and error. I had some problems with skinning because when I build the mesh in Maya I have more experience and better control, got there in the end though. The below character went missing in action before he even got any colour to him. I have swapped over to xNormal for normal mapping now as it's much more consistent for creating  normal maps. Z-Brush is great for modeling but there are often problems if you use it to generate your normal maps.


Space Trooper Z-Brush version

Space Trooper Back
Above is the Z-Brush model from which I generate the normal maps from. He doesn't have his giant metal cuffs on as they needed to be done as two separate models. I learned a bit more about modelling machined metal surfaces from the cuffs which I also ended up doing over, three times in the end but I guess it was worth it as I went onto you tube to track down some useful tutorials which will be useful for the future. I would still like to make a robot model at some point and have not forgotten how popular the steam punk robot design I did was.
Space Troopers various poses


Space Trooper reference image showing controls
You can see the rigg above. I accidentally left a triangulated laser gun in with the quad mesh which probably sounds like gobeldy gook to most of you. However as a result I finally got round to swapping in a rifle, just the quad version but what this means is I discovered it's very easy to swap in different rifles. I have been planning on creating a new rifle model for ages. Now I know that there is no technical problem in the way.

Space Trooper UV map

Above is the UV map as usual I got everything on one sheet to keep things nice and simple. That's the colour map there which you can use without any of the other maps if you want. The normal map does look great but at a distance you can drop it to save memory.
Space Trooper 4 colour variants


Next the wire frames, it's a slightly higher poly count for this model at 3756 but still relatively low. The rifle is relatively high at 598, another reason I've been thinking about making a new one as I reckon I can get a lower poly version that actually looks more detailed now I have more experience with Z-Brush. You can see that the cuffs are separate pieces although the mesh is one node. The cuffs are skinned with a value of 1 to a forearm joint which handles the twist you get when you rotate you wrist. I've refined the rigg on this and it's working nicely.
Space Trooper Wire Frame


On to the animation set, I added a walk cycle and a jump animation to the old set so he still does all the running, strafing and death diving as before.


So there we go mission accomplished. One Space Trooper reporting for duty.

Space Trooper Salutes You!

Sunday, 28 April 2013

Cyber Punk Shoot Out


Cyber Punk Title

Cyber Punk gets zapped with a red laser


Cyber Punk lets em have it

Cyber Punk has bought the farm

Zap zap pew pew pew kaboom arrrrrrrgh! It's time to shine up your laser cannon and make sure the batteries are charged! Those crazy cyber punks are having a proper shoot out and it doesn't look like they're planning to quit till things get crispy.

I have been saying that I was going to post this video for months and now I have finally got round to it. Would you believe the only thing stopping me was that I needed to do the screen grabs you see above? Well I finally got my act together. I am feeling a bit burnt out today working on a set of animations for my current project. I am working on a really cool game at the moment that as usual I can't talk about (I think saying that it's cool and something I've always wanted to work on is allowed).

I finished making this video months ago but I still remember how much of a pain in the ass the rendering program Mental Ray was. I got this horrible error message when I tried to use motion blur "shapes are not equivalent, no motion vectors computed". It took me quite a lot of fiddling about to get it to work. It seems it's one of those errors where you find lots of dead ends when trying to search for a solution online. I wasn't prepared to give up on having motion blur, it seems like a basic right that no animator should be denied so I persevered. It can be as simple as deleting history from a model but in this case it was because I was animating visibility, so be warned. I still find it utterly ridiculous that Mental Ray can't cope with animating the visibility channel. A very basic and useful technique that I've been using for years.

The video pretty much speaks for itself, lots of crazy punks with laser guns blow the crap out of each other. Enjoy!


Wednesday, 8 February 2012

Orc Warrior #6 animation complete

I've completed the animation set for the Orc Warrior model and he is now available to buy on TurboSquid. The renders are from the product page and there is also a 360 revolve of the Orc model on the TurboSquid product page. I think he looks down right Orcy and fulfills all agenda necessary to be counted a thoroughbred green-skin. He now has a full set of animation brimming with "Orcy know whats" and low brow aplomb.


It's been a fun model to work on. I've learned more about texturing from the Orc and I'm happy with how he turned out. I always prefer to animate characters who have some character and for some reason, I prefer lumbering brutes to more agile, graceful characters. I put a combo attack on The Orc which was fun to do. There's a mildly Street Fighter-esque twist which you might spot, something a bit more Blanka would probably have been more appropriate.

I have to admit I always wanted to build an Orc, I used to draw them in the back of my school exercise books instead of doing any work. I thought working in the games industry it was bound to come up at some point, but in the end I had to take things into my own hands......ho hum mission accomplished, better late than never.

I put together a complete list of the animations shown from the Maya work window, very much a case of what you see is what you get (Maya is the program I built the Orc in). Rendering the animations with proper lighting, motion blur etc will give much better results but I wanted to show that this model will run very well in real time. This is down to the low poly count. There are 47 animations total which makes the Orc Warrior a good solid games character with plenty of scope.

Maybe a project for the future will be Orc versus Ninja with a nice polished render.


 List of animations as shown in the clip:


20-56           Orc Warrior Walk
70-109         Orc Warrior Combat Idle
120-148       Orc Warrior Run
160-190       Orc Warrior Attack 1 Heavy Overhead Strike
200-231       Orc Warrior Attack 2 Heavy Cross Slash
240-266       Orc Warrior Attack 3 Shield Charge
280-313       Orc Warrior Death 1
330-353       Orc Warrior Death 2
360-379       Orc Warrior Strafe Right
400-419       Orc Warrior Strafe Left
430-454       Orc Warrior Jump forwards
480-503       Orc Warrior Dodge Right
520-543       Orc Warrior Dodge Left
560-569       Orc Warrior Fall
600-610       Orc Warrior Land
620-625       Orc Warrior Shield Up
630-635       Orc Warrior Shield Idle
640-645       Orc Warrior Shield Hit Block
650-658       Orc Warrior Shield Down
670-675       Orc Warrior Small Hit Reaction Front
680-685       Orc Warrior Small Hit Reaction Left
690-695       Orc Warrior Small Hit Reaction Right
700-705       Orc Warrior Small Hit Reaction Back
710-715       Orc Warrior Small Hit Reaction Mid
730-740       Orc Warrior Big Hit Reaction Front
750-760       Orc Warrior Big Hit Reaction Left
770-780       Orc Warrior Big Hit Reaction Right
790-800       Orc Warrior Big Hit Reaction Back
810-820       Orc Warrior Big Hit Reaction Mid
830-859       Orc Warrior Combat Walk Forward
920-949       Orc Warrior Combat Walk Back
970-980       Orc Warrior Combat Turn On Spot Left
990-1000     Orc Warrior Combat Turn On Spot Right
1020-1080   Orc Warrior Guard Stance 2
1080-1110    Orc Warrior Guard Stance 2 to Guard Stance 1
1110-1170    Orc Warrior Guard Stance 1
1170-1200    Orc Warrior Guard Stance 1 to Guard Stance 2
1220-1270     Orc Warrior Taunt/Roar
1280-1312     Orc Warrior Attack 4 Upwards Strike
1320-1350     Orc Warrior Attack 5 downwards chop
1370-1410    Orc Warrior  2 hit combo
1430-1485     Orc Warrior  3 hit combo
1500-1530     Orc Warrior Combat Stance To Guard 1
1540-1555     Orc Warrior Guard Turn On Spot Left
1570-1585     Orc Warrior Guard Turn On Spot Right
1590-1597    Orc Warrior Into Combat Stance
1610-1634    Orc Warrior Jump On Spot

For more details and specs for this model please visit the Orc Warrior product page.

So..........what to do next? well I've been thinking it's about time my short film Space Temple went online, so it will shortly be arriving here.

Thursday, 22 September 2011

Game Sprites

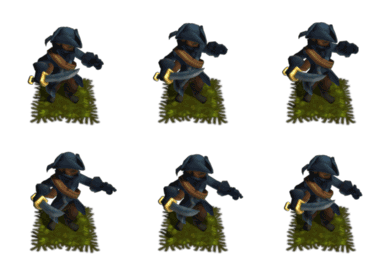
Here is a sneaky peek at the project I've just been working on. I recently finished working on my first sprite project and I loved it!. My client kindly gave me permission to show a couple of the characters here. I can't give anything away about game play or other details at the moment, but once it's released I will post links to where you can get a copy.
The bandit character playing an idle.

It felt like working on a proper game as all the games I used to play were 16 bit. By the time I was working in games it had all gone 3d. I have stuck to what I know, so as you can see, my sprites are 3d models that are rendered. What I've done is tried to inject all my happy memories of super nintendo carts and arcadey goodness into this project.


The difference is, because everything is rendered image files for sprites, I had much less to worry about: does it render, does if fit in the frame? job done. I've done bug fixing for games I've worked on in the past, (all 3d,) and  there is a lot more that can go wrong with a 3d model. Textures, poly mesh, riggs and animation can all have bugs.
This is the Bandit character. A simple mesh with cartoony proportions.

Sprite design was also great fun, because your dealing with something that needs to be recognisable at a very small scale, you can create very broad archetypal characters. They were great fun to animate.

The guards armour was another fun job to build and animate.

There are loads more characters to show and I am looking forward to seeing this one published. In the meantime you can see the guard and bandit animated below.


Friday, 9 September 2011

Chest Mimic #5 Animation Set Complete


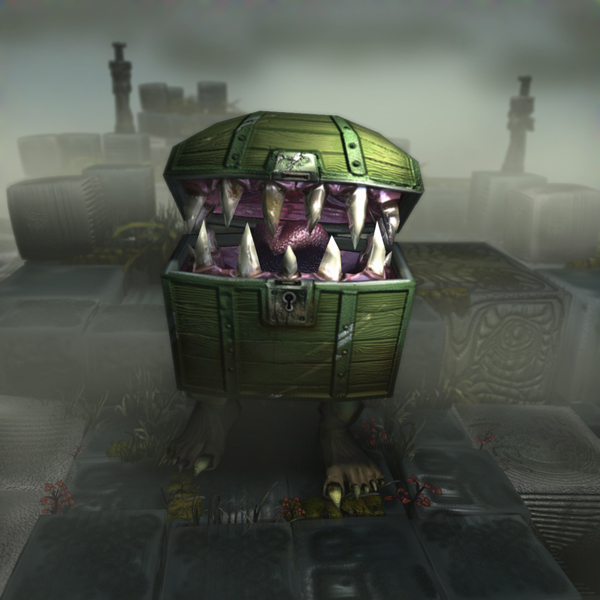
I finished the Chest Mimic. It’s my second low poly games character for Turbo Squid and it comes with a full games animation set. The demo video is below (above the animation list).

Turbo Squid now require a render with a back ground so I made use of a certain temple Temple. Here are a couple more renders I did for the product page.


The render was a real ball ache for the demo vid, I used ray trace which is much slower than my usual depth map method. One of the renders took around nine hours and I also cleverly overwrote and had to do it twice. Not fun!

The good news is it looks peachy and you get to see all the animations! I think the animations worked really well on this character.


Here’s the complete animation list, I added a few thing since the last post.

20 to 49            Chest Mimic Walk Cycle       
60 to 92            ‘Chest Mimic Run Cycle       
110 to 136        Chest Mimic Chest To Mimic       
150 to 209        Chest Mimic Idle           
240 to 264        Chest Mimic Attack One       
290 to 320        Chest Mimic Attack Two       
350 to 374        Chest Mimic Attack Three       
400 to 465        Chest Mimic Death One       
490 to 580         Chest Mimic Death Two        
590 to 600        Chest Mimic Turn On Spot Left  
620 to 630         Chest Mimic Turn On Spot Right  
650 20 665        Chest Mimic Dodge          
680 to 690        Chest Mimic Fall          
700 to 710        Chest Mimic Land          
720 to 730        Chest Mimic Hit Reactions Front  
750 to 760        Chest Mimic Hit Reaction Left   
780 to 790        Chest Mimic Hit Reaction Right  
810 to 815        Chest Mimic small hit reaction Front
820 to 825        Chest Mimic small hit reaction Left
830 to 835        Chest Mimic small hit reaction Right
860 to 940        Chest Mimic Incidental
940 to 950        Chest Mimic Mimic to Chest
950 to 980        Chest Mimic Chest Form


Attack One also works as a jump, games characters have to have a jumping attack it’s the law.

As with the last games character I did (the Ninja) this model ticks all the boxes for game ready, a one piece clean mesh, zeroed, low poly and bind pose included. With these models I basically just build them to the same specs I did when I was working for games studios, in fact if anything they  are higher quality because I can spend more time on them.

Here's a link to the model on Turbo Squid.

Friday, 8 July 2011

Chest Mimic #4 Bite and Run!


Here's an update on the Chest Mimic, I've done an animation for the initial reveal when an unwary adventurer goes to the chest hoping for well deserved potions gold and epic trinkets, only to discover many more teeth than he had bargained on.


I've been thinking on what animations the Chest Mimic will need and here is my list so far:
 Animation List Chest Mimic

20 to 49        Walk Cycle     Done
60 to 95        Run Cycle     Done
110 to 136        Chest To Mimic     Done
5Idle   

9Attack One
8Attack Two
7Attack Three
6Death One
5Death Two
4Incedental
3Turn On Spot Left
2Turn On Spot Right
1Dodge

I'm not sure whether to add a jump to this list. This would be so the Mimic would not be left behind if it's prey were to jump to safety leaving the Mimic marooned. It could work for game design as a way to ditch the pesky Mimic, but maybe I should give the option for the Mimic to jump. If I do a jump a fall animation will be needed too.

I'm still freelancing on another project so Mimic updates are likely to be sporadic. I have permission to post a couple of characters from the freelance work on my blog I just haven't got round to it yet.

Monday, 28 March 2011

Chest Mimic #1 Poly Mesh

I've started on the chest mimic today. I started by building some low poly legs. All the detail with this creature is going to go into the legs and the teeth. I'm planning on a long tongue also, that will be rigged up to animate. If you have read Terry Pratchett's  The Colour of Magic your probably familiar with the idea of chests sprouting legs and trying to bite you. The Mimic is a classic Dungeons and Dragons creature. Often disguised as a treasure chest to catch out the unwary.


The legs are quite short and should give the chest a nice broad waddle like a drunken angry duck, at least that's the picture I've got in mind at present.
I actually bothered with toe nails on this model as there is a lot less detail to worry about on this character compared to a normal character. Heads and hands usually eat up your poly budget with a more standard games character.


 Here is an early shot of what I've got going with the teeth. Pretty basic at the moment, the upper set fit with the lower set to a reasonable standard at the moment. I may want to put some more polygons into the teeth to stop them looking so angular, or I may leave them not sure yet.


 I also did a test animation for fun. Just to see how the teeth are fitting and if it will look right when I'm finished. Looks like this toothy critter is going to be fun to work with.