Showing posts with label cgi model. Show all posts

Friday, 27 November 2015

Shotgun 3d model

Shotgun Pump Action

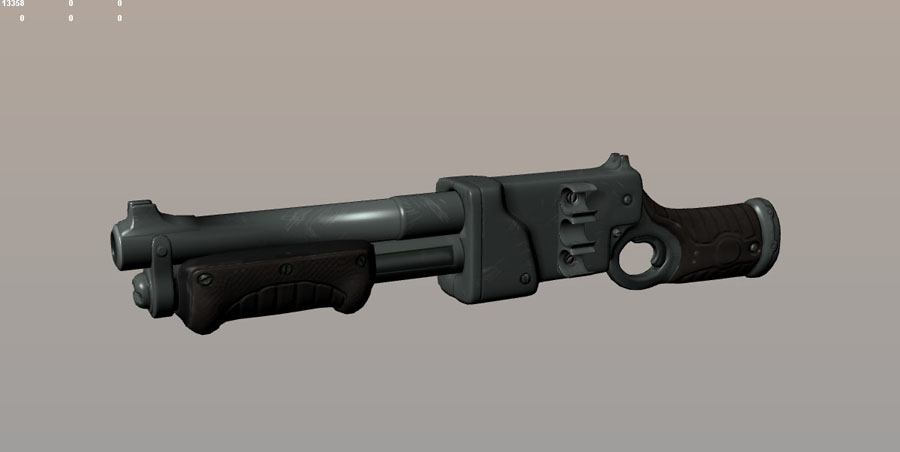
Here is my new Pump Action Shotgun model available from Turbosquid now. You can get it for Maya, Max, in fbx, or obj format. It's a polygonal model coming in at  faces 7519  verts 7485 for the shotgun with three cartridge models included. If you go over to turbosquid you can see a little animation of the shotgun pump action firing and ejecting shells.


I'm going to talk here a little about how I built the model and converting it from Maya to Max.
Shotgun base mesh in Maya
Maya Low poly shotgun
 I started out with a low poly base mesh which I built in Maya I then UV mapped the low poly model. I decided to have a look around to see if I could find a better UV mapping solution for this model. I normally make organic models and have been using Zbrushes UV master but it's no good for mechanical stuff like the shotgun. I ended up using Roadkill, it's a good program for low polygon. I also tried Maya's unfold but found it to be so loaded with bugs that it was unworkable.

Roadkill shotgun UV mapped showing UV islands
Shotgun in Roadkill for UV mapping

Once this was done I exported the model as an obj and brought it into Zbrush for detailing. I separated the model into a number of subtools so that I could get a higher level of detail into the model.


Base model in Zbrush
Below are my high poly Zbrush sculpts with a shiny material on them so they look pretty. I found it quite hard to sculpt a mechanical object like this, but the idea was to push myself specifically into a hard surface object and I learnt a lot from it.


The next step for me was to get normal maps from the high poly sculpt onto a lower poly version of the shotgun. For this step I used xNormal which I have been using for a while and for me it seems the most reliable tool for this. As I had a number of subtools and because some areas of the shotgun overlap I used my subtools to normal map the shotgun in sections that fit into one texture page when assembled (if you look at the Roadkill screen shot you can see my texture page). Overlapping objects in normal mapping will cause errors if not dealt with separately.

This is where things went wrong..................
I had some ugly texture stretching going on which you can see above. The strange saw tooth effect showing on the piece above is pixelation on a normal map. What I did to fix this was re-map the shotgun at a higher poly division and also I altered my UV islands. I also rebuilt the barrel and used edge creasing in Zbrush to keep my edges sharp. The rifle butt needed re sculpting as I didn't have enough geometry in my low poly to make my original version work. All useful things to learn, edge creasing in Zbrush is an easy way to keep your crisp edges. For mechanical objects it's better to be generous with your low poly when it comes to curved areas like the rifle barrel. I discovered that Roadkill does not cope with higher poly models and ended up mapping the shotgun in sections, it wasn't too bad, I used the subtool division from Zbrush.


Next step texturng. Above is an early base colour version. You can see the barrel has changed from the Zbrush version. Below is the altered mapping from the higher poly division shotgun.

One more thing I wanted to share, as it drove me up the wall. This is the first model that I have converted to Max. It's pretty simple for a model like this which is just geometry with some separate parts. I exported the model as an obj. I learnt that to keep my pivot points accurate I needed to export all elements from the origin. I learnt how to rebuild my materials in Max, all pretty straight forward........until normal map seams!

The horror!

I'm going to run through what happened and how I solved it starting with setting up the normal map slot in the material. The first step is to go to the maps section of the material. Set the bump map amount to 100, default is 30. Next click the map button marked none, select "Normal Bump" from the Material/Map Browser. Now select the normal texture node.
Normal Map set up in Max help images for setting up your normal map texture file
Select the Normal slot marked none and pick bitmap from the Material/Map Browser. Lastly and here is the fix. Once you have navigated to your normal map texture file go to the gamma option, select override and set it to 1 as shown in the image below. The problem is due to Max's default gamma option being set to 2 which gives you your seams.
Max gamma fix for normal map seams which options to use
I had to do lots of googeling to get to the bottom of that one, so I hope this will help others with there normal map woes. Typical Max that the default value doesn't work.
Fixed!
I could also tell you a thing or three about shotgun calibre, imperial to metric but I think it might be too exciting for you (sarcasm).

Shotgun pump actionShotgun Wireframe

Wednesday, 18 June 2014

Z-Brush Horned Green Dragon

Horned Green Dragon main
Screen grab of Zbrush sculpt with polypaint.
I've been thinking about making a dragon model for a very long time and actually started doing something about it. I decided to just open up Zbrush and go at it. I think sketching in 3d is sometimes easier than on paper. You need to put more effort in to get a decent looking 3d model. However a drawing  can give the illusion of a nice form with out true substance. You find the flaws of the drawing only when you try to build it.
Horned Green Dragon Side View


Horned Green Dragon Low angle

 Inspiration For The Dragon's Head

I've painted dragons here before and read up on descriptions of what dragons look like. They are described as having elements of the horse, camel and dog. A very broad mix to play with and part of why I enjoy making fantasy creatures so much. I have some pictures that live in my head when I think of dragons, I can remember seeing Smaug by Greg and Tim Hildebrandt on the cover of the Hobbit when I was probably 8 or so. Strange to see two brothers credited for the same picture, I had no idea it was by two artists. That picture echoes round the web as well as the inside of my head so I expect many of you will recognize it.

Another big influence for me was lead figures for fantasy games like Dungeons & Dragons. I actually went looking for some of the miniatures I used to have and found The Great Fire Dragon, there's clearly an influence there. I couldn't find the artists name but it's fair to say that the artists who made those figures had a big influence on me and I learned a good deal of what I know about painting from painting miniatures. More recently I saw the cover art of John Jude Palencar for the novel Eragon and that stuck too.

Horned Green Dragon montage

 Making The Dragon's Head

I screen grabbed the dragons head at intervals as I was working so you can see how the dragon developed. The dragon started as a poly sphere and I remeshed round about every time I did a screen grab. Remeshing prevents the polygons from being overstretched when you are putting detail into an area which  lacks the required number of polygons.

This model was intended to develop ideas and have fun. I would normally build a base mesh in Maya with a low polycount with the intention of having a fully poseable skinned model. I may still do this but I enjoyed just focusing on sculpting for a change. Low poly modeling is a very different process and not as good for developing ideas. Zbrush has a much more organic feel which very much suits pulling around fantasy creatures.

 
Horned Green Dragon WIP #1
 I start with basic shapes which I pull around using the move tool.

Horned Green Dragon WIP #2

Horned Green Dragon WIP #3

Horned Green Dragon WIP #4
 Once I had the head shape looking the way I wanted I put the details in.

Scales are quite easy and fun to do using Zbrush.

If you have a nice form to start with the scales almost draw themselves.

That was where I stopped on the sculpt.

Early polypaint, I experimented with some materials too.

Almost there, this is an outliner material that helped the texturing.

Painting The Dragon's Head

I painted the model using polypaint in Zbrush. It's probably the first time I've used it so much and it worked out quite well. Because I  painted directly onto the model in the same way I sculpt, it's much easier than painting an unfolded map in photoshop. I did use photoshop to tweak a little but for the most part it's polypaint. The best part is not having to guess how it's going to look. When you're painting the flat map what you're looking at is a peculiar pancake version of your dragon that looks like it has been skinned ready for stuffing. This is not a rendered model, all the images are just screen grabs so this model could look even nicer with the right lighting.

If I develop this model further (which depends on how much attention it gets) I think I would start thinking about more of a crest of horns and a larger mouth with more prominent teeth. I would also texture the eyes as they are currently just placeholder spheres with a material applied.

If you would like me to develop the dragon further please like, +1 and/or share this post and I will get the message. Thanks to all the plussers on my last post I very much appreciate active readers, this blog welcomes and needs your support.


Friday, 23 May 2014

Animated audition a short slap stick test

Here is an audition I did for a job at the start of the year. The mail came out of the blue on the 3rd of January "We would like you to complete the audition ASAP".  I was given a version of the model to work on by the company but the rigg didn't work and the mesh had errors and too much subdivision to skin easily so I had to rebuild and re-rigged it. It was a bit of a mad rush to get it done in time but good practice. I always liked cartoons like Road Runner and the Pink Panther so it was fun to do something slap stick. One of the best things about it was I showed it to my kids and they loved it. I  really enjoyed doing the animation and hope you enjoy watching it , I haven't done something like this for a while so it made a nice change.


It's a little bit like the style I used to work in when I worked for Kuju on the Eye Toy games, I have an urge to try doing some more work like this as it came very easy to me. The swords and sorcery stuff I'm working on at the moment is a bit of a battle at times. The funny green thing I animated for the audition was much easier to set up and build than the characters I've been making recently. With a bit of Z-brush fiddling it could look really cool I think.


The clip above was a style test I did for Kuju.

Monday, 17 March 2014

Flame Troll #3 Flame Spear

Flame Troll "Hey I'm Walking Here!"
 
Flame Spear #1
Here comes the Flame Troll with his Flame Spear! The animated gif was grabbed from the Maya file using Fcheck with the high quality render on the viewing panel. High quality render is in terms of real time render.....so not really high quality just a quick grab. I thought seeing as in my previous Flame Troll entries I mentioned how I had him walking around, I should provide evidence of this. The reason why I didn't put him up before, I suppose some of you might be able to guess; the rigg is my standard rigg which I use for most of my models and most of my models are sci-fi orientated so the troll was walking around with the same giant laser gun most of my characters come equipped with.

The Flame Spear is a pretty simple model, I enjoyed making it and it made a nice change from having to worry about skinning and all the hassle I had with making the functioning plate armor for the troll. I was really happy with the way the design turned out and having to work through all the surfacing on the armor suit and the designs of the seals and sigils on the armor definitely helped me with the spear.

I loved sculpting the details in Z-Brush, the flowing fret work I did in the centre of the spear was done with masks and using the symmetry feature where work on the left half is repeated on the right. Very quick to do so I think I did a few versions but very fun, the kind of thing where it's so easy you feel like you're cheating.

After having an easy time of it with the sculpting I hit a brick wall with the normal mapping and couldn't understand why. I was getting very strange warping on the blade edges of the spear which made no sense to me as the high poly sculpt and low poly base were extremely similar. I turned to the internet and searched for the solution but it seemed an uncommon problem. I found many tutorials on how to make edged fantasy weapons, none of which had the same problems I was having. I finally found something about triangulation needing to be the same in Xnormal as in the source program (maya), my low poly model was mostly quads so I triangulated it and that solved the problem. It never occurred to me that Xnormal would divide quads differently.

Flame Spear page

I've used a little bit of self illumination, (or incandescence as it is in Maya) on the spear jewel. It's a separate map like the colour map but it holds only the colour that should glow, in this case a subtle rosy red  on the jewel itself and also on the metal around the stone. It gives the impression that the luster from the stone is reflecting in the metal.

Below is the colour map and normal map. The incandescence map is not much to look at being mostly black. I put the normal map in as I talk so much about them but I guess if your not used to 3d you would not have seen one before. The normal map works with the three colour channels red, blue and green. Each colour behaves as a projected light hitting the detail of the surface of the model from a different direction. This information then gives the impression of surface detail when rendered in a 3d program. It's similar to the old grey scale bump maps I used to use except that they are just dealing with height, black being in white being out to give the impression of bumps hence bump map.


Flame Spear Colour Map

Flame Spear Normals


 Below is the Z-Brush sculpt of the spear, there was some fret work on the base of the spear that was so fine it was really not worth the bother, as to see it requires getting so close to the model that the low poly nature of the base model ruins the effect. One day I will learn not to go over board with details....maybe.

Flame Spear Z-Brush


Flame Troll and Spear #1
 To finish a couple of renders of the full model, I will be returning with more of the Flame Troll as I have built an environment for this character too, an archetypal dungeon/ castle cell with flaming torches, sturdy hewn stone walls and studded wooden doors. I am intending to animate some new work for my showreel with this set up as in my recent audition work I am often asked to animate scenes which I don't currently have on my reel. I think there are way too many walk cycles in my reel and it needs some Flame Troll to liven things up.


Flame Troll and Spear #2

Wednesday, 12 March 2014

Flame Troll #2 Armor texture and surface sculpt


Troll Prototype
Proto Troll needs texture love


Back to the Flame Troll and this is where I left it last time; an early base mesh for a full plate armored suit. Some skin tests done to check the mesh, I got the troll walking around, textures are placeholder tests and no real UV mapping done at this stage. The Troll is fully articulated without too much fancy rigging.

My next step was the UV map, for this I use a mix of Maya and Z-Brush UV Master. I sort out my UV islands in Maya first then I go into Z-Brush and Use the UV Master plugin for a straightforward flatten but keeping my UV islands, I generally end up re-positioning the layout of the UVs in Maya at the end to tidy up. A bizarre mechanical job but it has to be done. Below you can see the entire armor suit except for the shoulder, elbow and knee pads which I put on a separate texture page. I always snap shot my UVs before I go into texturing so I have an overlay which shows me where and what I'm painting. Sensible layout of the UVs also helps with this so for example at the top of the page in the middle are all the Troll's fingers. It makes it easier to paint if elements of the model are where you expect them to be, otherwise you have to cross reference with Maya to track down what you want to paint. Although there is generally an unavoidable period where you need to familiarise yourself with your new UV map.

Troll Armor UV

 Once the UVs were out the way I took the model into Z-Brush and started sculpting. I quickly discovered that I could not get the level of detail I wanted with out hitting the poly limit for my machine so I had to divide the model up into several sections. In this way I could go to the maximum poly limit on each separate piece and so have an overall poly limit that was much higher. The body had 6 separate sections in the end which were: arms, chest plate, gauntlets, legs and additional armor plates.


Below you can see work in progress normal maps on the model. What I usually do is set up with Xnormal so I can drop my normal maps onto the model as I am adjusting my sculpt in Z-Brush so the screen grabs below are from Maya. It means swapping around between software which is a drag. When I first started using normal maps I would do all my sculpting, finish it and then generate my normal maps and drop them into Maya. This means less messing about but can lead to unforeseen errors which you can catch if you check your work as you're creating it. I find it less of a headache to keep an eye on any developing problems as I'm working rather than get all the way through the sculpt and then have a nasty surprise.

Troll Normals WIP #1
The mat version above is an earlier version than the shiny silver version below. If you look closely you can see there are lots of blank areas on the armor in the pictures above and below which I filled in later, like the phoenix that I sculpted into the centre of the breast plate. These pictures show the model with just a base one tone colour applied to it. All the rivets and gubbins are coming from the normal map.

Troll Normals WIP #2


 Below you can see the separate sections sculpted in Z-Brush. I really liked the Phoenix design I came up with for this characters breast plate, I decided that I wanted the Troll to have a magic flaming spear and that he needed an emblem of fire to go on his armor. I doodled out a phoenix holding the rune for fire on a scrap of paper and then transferred it to the armor using Z-Brush (by eye). You can find all sorts of runes and ancient symbols by checking the internet and it can be lots of fun researching this kind of thing. Or you can just use your imagination.
 

Troll ZBrush Sculpts
Once my sculpt was done it was time to move on to the texture painting. Below you can see the model before I started really going into the painting so you're just seeing the detail of the sculpt transferred onto the model through a normal map. The result is a very  beaten up surface that seems peculiarly clean and plastic, time to get painting!

Troll Head and Shoulders Normals

Troll Back Normals
Back view ready for painting
Troll Front Normals
I set a simple pose for rendering so I can check my work as I paint   

Troll Side Normals

Here are some details from the texture sheet, these are the hand painted flat images that I mapped to the model to complete it. You can see the Phoenix breast plate and one of the shoulder plates, these flat images work in combination with the surface sculpt to give the impression that dirt has caught in the recesses and that the corners and raised areas have been scratched  and battered. I use an ambient occlusion map as a starting point to paint from. It often helps the model to paint in details that are not in the sculpt so you should not stick too rigidly to the ambient occlusion, (within reason of course).

Troll Texture Detail #1


Troll Texture Detail #2


Again  as I'm painting I am constantly checking the results in Maya and running off the odd render.


Troll Textures WIP #1


Troll Textures WIP #2


Flame Troll Back View

Flame Troll Front View

So there you have it one flame Troll in a suit of long serving battle worn armor, complete with sigils and magic seals.

 We are not done yet though as next will come the spear.

Flame Spear Wip